
The Ultimate Guide to RV Skirts for Winter: Top Kits & DIY Options
Key Takeaways
RV skirts for winter block cold air from reaching your underbelly, preventing frozen pipes, cutting propane use, and keeping floors warmer.
Commercial kits range from $100 DIY panels to $2,500+ custom vinyl; DIY options run as low as $25–$300.
Insulation value (R-value) matters as much as price — rigid foam and insulated vinyl outperform lightweight canvas and inflatable tubes for raw thermal resistance.
Moisture management is the most overlooked step in RV skirting — done wrong, skirting traps humidity and causes mold or floor rot.
The right skirt depends on whether you're staying parked all winter or moving between sites.
Jump to a Section
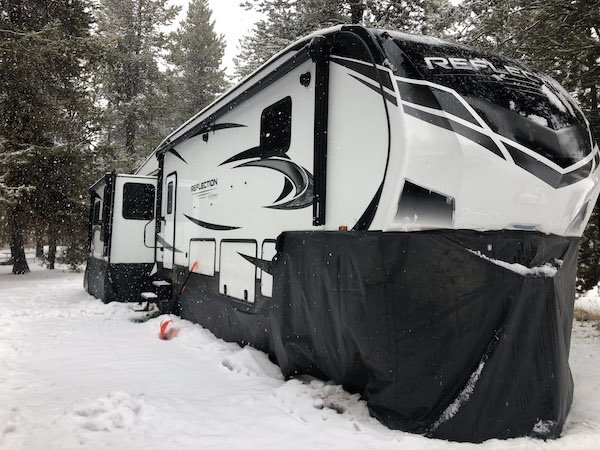
For the first few years of living the full-time #RVlife, we followed warm weather. We didn't have a desire to brave the cold in our fifth wheel. But then something happened — we missed winter. So we decided to give winter camping a try. I'm happy to report that RVing in the winter months is not only possible, it's genuinely enjoyable, and finding the right RV skirts for winter made all the difference. Thanks to our RV skirt, we've been able to stay warm and cozy inside no matter what the temperature does outside.
There are a number of ways to keep your rig toasty when it's cold, but RV skirting for winter camping remains one of the most effective ways to protect the interior and underbelly of your trailer. The right choice depends on your rig, your budget, your location, and — just as importantly — how often you plan to move. Below is everything we've learned firsthand, from the products we've tested to the DIY builds we've seen work (and fail) in the field.
What is an RV Skirt?
RV skirting is a protective barrier system installed around the bottom perimeter of your motorhome, fifth wheel, or travel trailer. This essential winter camping accessory serves several critical functions:
Key Benefits of RV Skirting:
Prevents frozen pipes and holding tanks by blocking cold air and wind
Reduces heating costs by trapping warm air and improving insulation
Maintains comfortable interior temperatures during extreme cold
Protects the RV underbelly from snow, ice, and winter weather damage
Significantly reduces propane consumption for heating
At what temperature do you need RV skirting?
Most RV experts recommend installing skirting once temperatures drop below 32°F (0°C), though many RVers see comfort and efficiency benefits even in milder conditions.
Comparison Matrix: All Skirting Options at a Glance
Before you commit to a product or a weekend DIY project, here's how every major option stacks up side by side.
| SKIRT OPTION | TYPE | PRICE RANGE | SETUP TIME | R-VALUE / THERMAL BARRIER | PORTABILITY | BEST FOR |
|---|---|---|---|---|---|---|
| AirSkirts | Inflatable | $1,299+ | 20–30 mins | Medium–High (air gap) | High (deflates) | Frequent travelers |
| Custom Vinyl | Heavy vinyl | $1,000–$2,500 | 1–2 hours | High (wind-block) | Moderate | Stationary / long stays |
| EZ Snap | DIY vinyl kit | $800–$1,000 | 2–4 hours | Medium–High | High | Handy DIYers on a budget |
| RV WindSkirt | Lightweight canvas | $200–$500 | 30 mins | Medium (draft-block) | High | Mild–moderate cold |
| Rigid Foam Board | DIY rigid panel | $50–$150 | 3–6 hours | High (R-5 to R-10) | Very low | Full-winter stationary |
Which Skirt Is Right for You? A Decision Framework
Rather than sorting by price alone and going simply on the question, EZ Snap vs. AirSkirts, start with how you actually plan to camp this winter:
Stationary / wintering in one spot
Rigid Foam Board or Custom Vinyl. Both prioritize thermal performance over portability, and since you're not breaking camp, the extra setup time and lower portability aren't a downside.
Frequent traveler / mobile RVing
AirSkirts or RV WindSkirt. Both can be set up and struck quickly, which matters if you're chasing weather windows or changing campgrounds every week or two.
Tight budget ($50–$250)
DIY Foam Board or Vinyl Tarps. You'll trade some durability and polish for a fraction of the cost, and foam board in particular still delivers strong insulation for the money.
Commercial RV Skirting Kits
There are skirting solutions on the market that make the whole process as easy and painless as possible. Ready-made RV skirts come in a variety of options to fit all types of rigs.
1. AirSkirts
Use code “boundless” at checkout for $100 off!
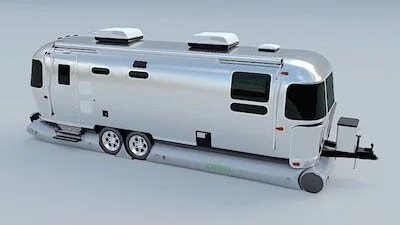
Something a little different from the traditional vinyl or fabric RV skirt is AirSkirts. This inflatable RV skirting solution is reliable and genuinely innovative — the "skirt" is made of cylinder tubes that are inflated with air. Kits come in a number of sizes to fit rigs of all sizes, and include tubes, an electric air pump, a storage bag, and a patch kit.
Inflatable cylinder tubes for easy setup and storage
Complete kits including electric air pump, storage bag, and patch kit
Universal sizing to fit all RV types
5-year warranty for long-term reliability
Insulation performance comes from the trapped air layer inside each tube — a real but moderate thermal barrier compared to solid foam
Perfect for mobile RVers who frequently change locations
Pricing: Starting at $1,299 | Best For: RVers who move frequently during winter months
Use code "boundless" at checkout for $100 off.
2. Custom Skirts

Use code “boundlessbakers” at checkout for $100 off!
A custom skirt is manufactured specifically for your rig. For a skirt made just for your setup, you can work with a company like The Skirting Co, which will travel to you for insulation, or ship a self-install kit through a service like RV Skirting Pros if you're too far for an in-person build. Custom skirting offers a precise fit with little room for gaps where wind and weather can sneak in. Most custom skirts are made from heavy-duty vinyl, and some — like The Skirting Co's insulated panels — carry an R-7 rating, putting them among the best-insulating options on this list.
Precision-measured fit for your specific RV model
Heavy-duty vinyl construction for maximum durability
Professional installation options available
Minimal gaps for superior weather protection
Multi-year lifespan with proper care
Pricing: $1,000–$2,500 depending on RV size and slide-outs | Best For: Stationary winter camping or long-term stays
Use code "boundlessbakers" at checkout for $100 off.
3. EZ Snap

If you want a high-quality skirt without the price tag of a custom model, EZ Snap RV skirting is a great option. It comes as a kit that you measure and install yourself — choose the size recommended for your rig, then install the fasteners, cut the material to your measurements, and hang the skirt (EZ Snap offers tutorial videos to ease the process). Kits are made of Diamond Weave™ premium skirting vinyl, a strong, durable material with half the storage bulk of regular RV skirting, and are rated to last 6–8 years in harsh winter environments. The most common kit size, 80 feet, runs $814.
Diamond Weave™ premium vinyl for superior durability
Self-installation kits with comprehensive tutorials
6–8 year lifespan in harsh winter environments
Reduced storage bulk compared to traditional skirting
Variety of sizes to accommodate different RV lengths
Pricing: Most popular 80-foot kit: $814 | Best For: Handy RVers seeking professional quality on a budget
4. RV WindSkirt

One of the most budget-friendly, effective manufactured options is RV WindSkirt. It requires much less work than the EZ Snap and costs a fraction of a custom model. RV WindSkirt only offers two sizes, but each accommodates rigs of all sizes thanks to a durable, lightweight canvas panel that attaches at the top and contours the ground at the bottom, sealing the gap between rig and earth. Velcro sewn onto both ends of each panel allows quick connection of multiple panels to fit any size vehicle.
Lightweight canvas construction for easy handling
Two universal sizes accommodate all RV types
Velcro connection system for quick panel attachment
Ground-contour design creates an effective seal
Compact storage ideal for traveling RVers
Pricing: $100–$120 per panel | Best For: Budget-conscious RVers and frequent travelers
DIY RV Skirting Options
Like with most things these days, the internet is full of DIY RV skirting ideas. DIY skirting can cost much less than a ready-made solution and be just as effective in cold weather — the tradeoff is more labor up front, and most DIY builds aren't practical if you're moving frequently. If you're staying put for the winter, a handmade skirt is a great choice.
1. Vinyl
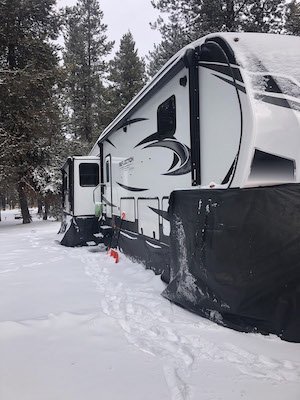
If you want something closer to a ready-made custom skirt but on a budget, DIY vinyl is a solid middle ground. You'll need enough vinyl to cover the outside of your rig plus a way to attach it — new vinyl tarps with grommets already in place make this easier, or for an even cheaper option, used billboard vinyl paired with grommets, Velcro, or suction cups. Rocks or wood planks can hold the bottom down in wind. Unlike rigid options, a vinyl skirt is still easy to travel with.
New or used billboard vinyl for cost savings
Grommets, Velcro, or suction cups for attachment
Rocks or wood planks for ground anchoring
Travel-friendly, unlike rigid options
Estimated Cost: $100–$300
2. Foam Board
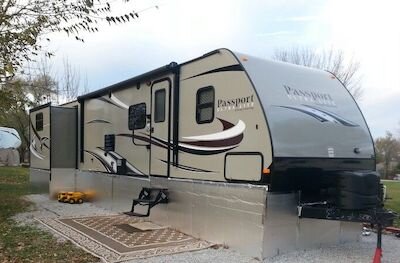
Insulated rigid foam board is a great option when building your own skirt. It's lightweight, easy to work with, and inexpensive — measure the board you'll need, cut it to size, and secure it to your rig, using aluminum tape to join boards and plywood to reinforce them. Foam board is probably the most effective DIY option from both a cost and insulation standpoint, delivering an R-value in the R-5 to R-10 range depending on thickness. The tradeoff: once it's up, travel isn't really an option.
Lightweight and inexpensive material
Easy cutting and installation
Aluminum tape for board connections
Plywood reinforcement for added stability
Most cost-effective insulation option
Estimated Cost: $50–$150 | Best For: Extended stays in one location
3. Straw Bale

If you're not planning to move, good old-fashioned straw can make for a great DIY skirt. Straw is a better choice than hay — it's cheaper and insulates better. Wrap bales in garbage bags or tarps to keep pests out (mice love a warm straw home), and keep in mind straw is flammable, so no open flames near the rig.
Excellent insulation properties
Wrap in tarps to prevent pest intrusion
Extremely budget-friendly
Fire safety considerations required
Estimated Cost: $25–$75
4. Snow
If you've got enough of it, snow can double as a DIY skirting solution — pile it up around the rig and you're set. For better results, use rigid foam board underneath the snow for an added thermal layer.
Free material when available
Combine with foam board for best results
Temporary solution dependent on weather
Zero-cost option for resourceful RVers
R-Value & Insulation Comparison
Price and setup time only tell part of the story — the actual insulation performance, or R-value, is what determines how much your skirting will cut propane use and keep pipes from freezing. Here's how the major options compare:
| MATERIAL | APPROXIMATE R-VALUE | HOW IT INSULATES |
|---|---|---|
| Rigid Foam Board | R-5 to R-10 | Solid closed-cell material blocks conductive heat loss directly |
| Insulated Custom Vinyl (e.g. The Skirting Co) | Up to R-7 | Layered vinyl with insulating fill blocks wind and holds trapped air |
| AirSkirts (Inflatable) | Medium (air-gap effect) | Trapped air inside tubes slows heat transfer, though less than solid foam |
| EZ Snap Vinyl | Medium–High | Dense woven vinyl blocks wind-driven heat loss effectively |
| RV WindSkirt (Canvas) | Low–Medium | Primarily blocks drafts rather than adding significant thermal resistance |
| Straw Bale | High (variable) | Dense natural fiber traps air well, though performance varies with bale density |
| Snow | Medium–High | Fresh, packed snow traps air well but insulation drops as it compacts or melts |
The takeaway: if raw thermal performance is your top priority — say, you're camping well below freezing for weeks at a time — rigid foam board or an insulated custom vinyl skirt will outperform lightweight canvas or inflatable options. If you're dealing with occasional cold snaps rather than sustained deep freeze, a lower R-value option like RV WindSkirt or AirSkirts may still be plenty.
Moisture & Condensation Management
This is the step most first-time skirters skip, and it's the one that causes the most damage. Skirting traps warm air against your RV's underbelly — which is exactly the point — but that same warm, enclosed space can also trap moisture. Left unaddressed, trapped humidity leads to condensation, mold growth on the underbelly, and in bad cases, rot in the subfloor or wood framing.
How to prevent moisture problems under your skirting:
Leave ventilation gaps or vents. Don't seal the skirting completely airtight — a small vent or two allows some air exchange and prevents humidity from building up unchecked.
Use a ground moisture barrier. Laying a layer of plastic sheeting or a vapor barrier on the ground under your rig, before skirting goes up, keeps moisture from the earth from wicking upward into the enclosed space.
Avoid trapping snowmelt. If snow or ice builds up against the skirting and starts to melt during a warm spell, that water has nowhere to go once it's inside the enclosure. Check periodically and clear melting snow away from the base.
Check tank and pipe insulation separately. Skirting helps with ambient temperature, but exposed tanks and pipes may still need heat tape or dedicated insulation — don't rely on skirting alone in extreme cold.
Inspect periodically through the season. A quick visual check every few weeks for condensation, discoloration, or a musty smell can catch a moisture problem before it becomes a mold or rot problem.
Choose breathable materials where possible. Some DIY builders assume fully sealed is always better — it isn't. A slightly breathable enclosure with intentional ventilation outperforms a "perfectly sealed" one in the long run.
Ground-Anchoring Techniques
Even the best-insulated skirt fails if wind gets underneath it. Sealing the bottom edge against the ground is just as important as the material you choose up top. Here are the most common anchoring methods:
PVC pipe pockets. Sew or tape a pocket along the bottom hem of vinyl or canvas skirting and slide a length of PVC pipe inside. The added weight and rigidity keep the bottom edge flush against the ground even in gusty conditions.
Water bags or sandbags. Placed along the base of the skirting, water bags or sandbags weigh down the material without requiring anything permanent — useful if you'll need to strike the skirt later.
Snow or dirt berms. In snowy climates, packing snow along the bottom edge creates an effective (and free) seal. A dirt or gravel berm works the same way in non-snowy but windy locations.
Heavy-duty gravel bags. Similar to sandbags but designed to hold up to repeated freeze-thaw cycles without splitting — a good option for a full-season stationary setup.
Ground stakes with grommets. For vinyl or canvas with grommeted edges, landscape stakes driven through the grommets into the ground add a secure, low-cost anchor point, though this only works on dirt or gravel pads, not concrete.
Whichever method you choose, the goal is the same: eliminate gaps where wind-driven cold air can get underneath and undercut the insulation you've just installed above.
Cost Breakdown by RV Size
| RV SIZE | DIY SKIRTING COST | PROFESSIONAL / KIT COST |
|---|---|---|
| Small RV | $250–$500 | $800–$1,500 |
| Large RV | $500–$1,000 | $1,500–$3,000 |
If you're on a tight budget, you can DIY your own RV skirting for under $250 using materials like insulation foam, tarps, or straw bales — though DIY skirting is generally less durable and effective than a professional kit, and may need more maintenance through the season. Professional skirting, on the other end, can run anywhere from $800 to $3,000 or more depending on size and material, with custom-made vinyl sitting at the top of that range as the most durable and effective option.
FAQ
Are RV skirts worth it?
Yes — if you plan on spending any time in cooler temperatures, an RV skirt is worth the investment. The benefits go beyond just staying warm: it protects your plumbing from freezing, reduces energy costs through added insulation, and creates a more comfortable living space overall. Whether you're camping in a true winter climate, settling in for an extended stay, or just want a cozier interior on chilly nights, the added insulation layer pays off in comfort, propane savings, and peace of mind.
What materials are commonly used for DIY RV skirting?
Common DIY materials include rigid insulation foam panels, heavy tarps or vinyl, hay or straw bales, inflatable tube systems, snow berms, or rigid panel systems you cut and fasten yourself. Each varies in cost, insulation value, durability, and ease of installation.
How do I install RV skirting properly?
Start by measuring the perimeter of your RV accurately, including any slide-outs. The material should reach close to the ground without gaps, with the top edge secured to the RV frame or a skirt flange and seams sealed. Add vents or access panels for utilities where needed, and make sure drainage isn't obstructed so water doesn't build up underneath. The goal throughout is to eliminate large air leaks under the rig while still allowing enough airflow to prevent moisture buildup.
Can RV skirting damage my RV or cause problems?
It can, if installed incorrectly. Skirting that's too airtight can trap moisture, encourage mold growth, or block ventilation that tanks and appliances need. A poorly secured top edge can also damage siding over time, and permanent installs can make maintenance access harder. Choosing breathable materials, leaving intentional vents, and making sure the skirting doesn't retain water are the key ways to avoid these issues.
How long does RV skirting last?
It depends on material, quality, exposure, and maintenance. Professional vinyl or custom kits often last 3–10+ years under good conditions. DIY options like tarps or straw bales degrade faster and typically need replacement or repair every season or two.
At what temperature do you need RV skirting?
Most RV experts recommend installing skirting once temperatures drop below 32°F (0°C), though many RVers see comfort and propane-savings benefits even in milder conditions.
This page contains affiliate links. That means we earn a small commission if you make a purchase through a link on this page. Thank you for your support!
——-